

Settings: Display
The DISPLAY tab of User settings is the device display editor. It decides which information each box in the topology views shows, for each kind of device and for ports, both up close and when you zoom far out. Use it when you want to read something else off the boxes at a glance, for example the DMX mode on every fixture, the software version on every node, or a value from a manufacturer-specific RDM parameter.
Open it with KLSTR › User Settings (press Cmd , on macOS, Ctrl Shift U on Windows) and click DISPLAY. Like every setting, a change applies and is saved straight away. How the window works is explained in Settings: View.
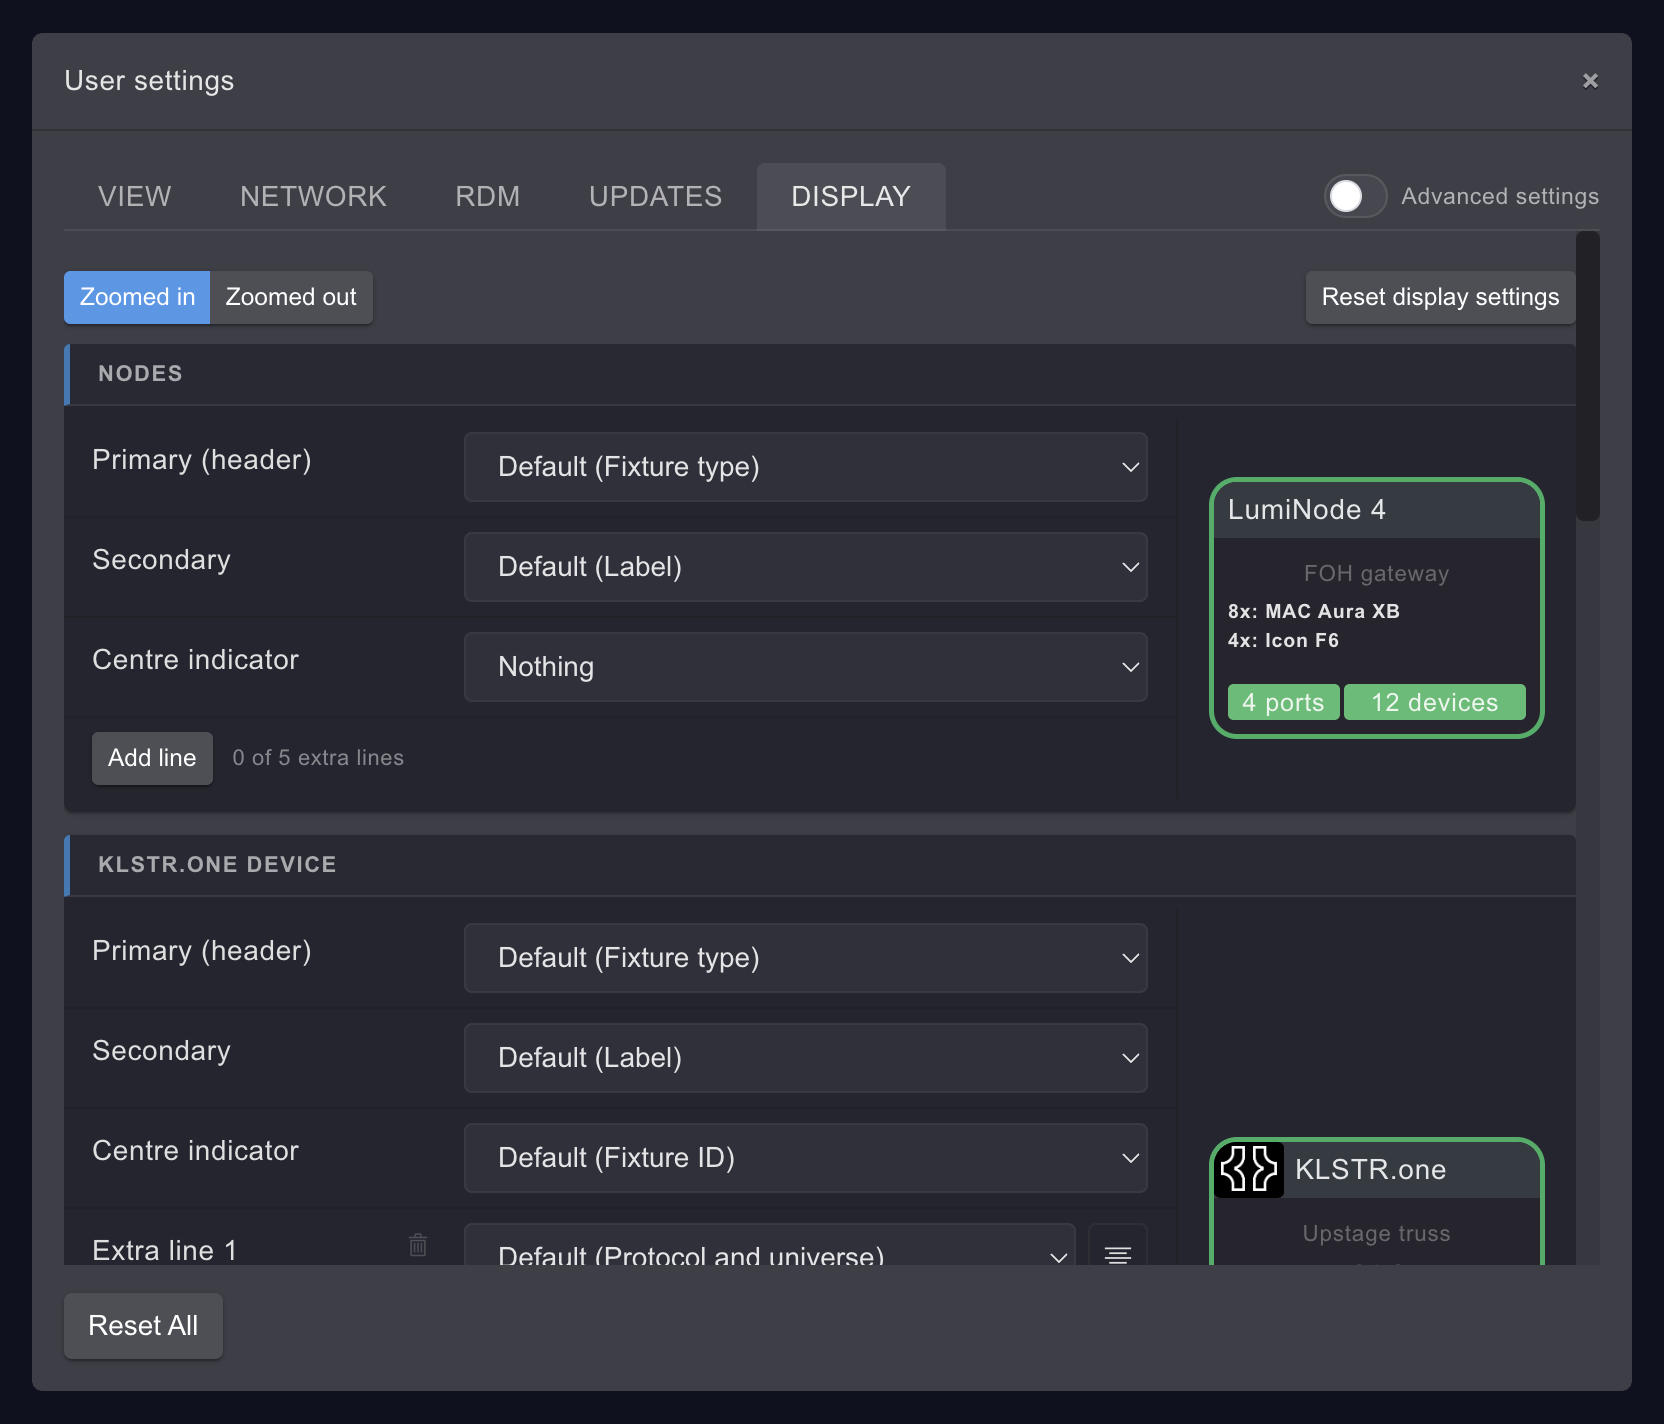
How the tab is laid out
- One card per kind of box. NODES (Art-Net nodes), KLSTR.ONE DEVICE (fixtures with a KLSTR.one), KLSTR.NANO DEVICE (fixtures with a KLSTR.nano), NON-KLSTR FIXTURE (any other RDM fixture) and PORTS.
- Rows on the left, preview on the right. Each row is one line of the box. The preview next to the rows shows a sample box with your choices.
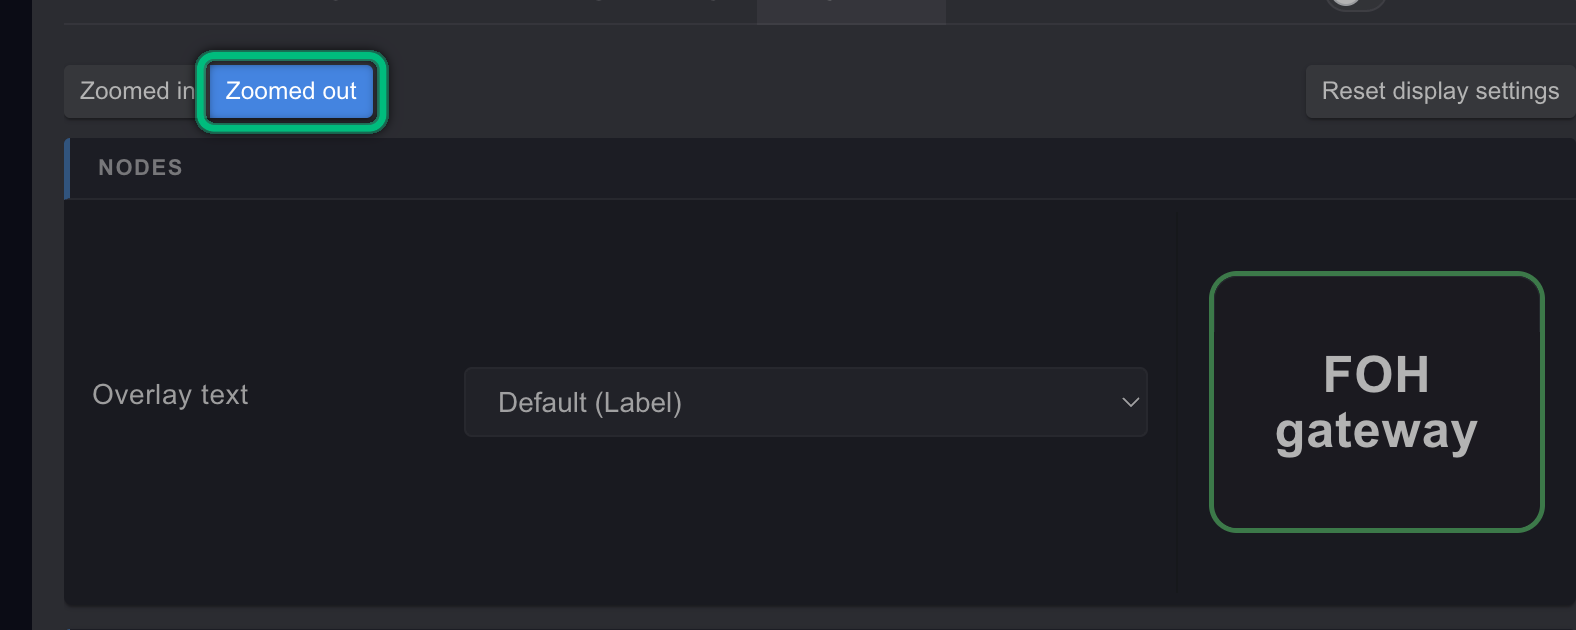
- Zoomed in and Zoomed out. The two buttons at the top switch every card between the lines of the full box (Zoomed in) and the single line that replaces the box when you zoom far out and the boxes get small (Zoomed out). The two are set separately.
- Reset display settings. Puts this tab, and only this tab, back to the shipped defaults.
The rows
| Row | Where it appears | Cards |
|---|---|---|
| Primary (header) | The header line of the box | Device cards |
| Secondary | The line under the header | Device cards |
| Centre indicator | The large value in the middle of the box | Device cards |
| First line, Second line | The two lines of a port box | PORTS |
| Extra line 1 to Extra line 5 | Extra lines under the centre indicator (or under a port's two lines) | All cards |
| Overlay text | The one line shown on the box when you zoom far out (Zoomed out view) | All cards |
Primary (header), Secondary and Centre indicator are also used outside the topology views: in the Fixtures table of the sidebar and in the fleet views of Advanced Sensors. Extra lines and overlay text appear in the topology views only.
Each row has a dropdown with these entries:
- Nothing: the line stays empty and takes no room.
- Default (...): the shipped value for this row, named in the brackets. It is selected while the row is on its default.
- The fields this kind of device offers, for example Fixture type, Label, Fixture ID, DMX mode or Software version. A field followed by a note such as (not shown in fixtures table or fleet views) works in the topology views but stays blank in the places the note names.
- Custom template...: a line of your own text with placeholders, see .
Extra lines have two more controls: an alignment button that switches the line between centred and left-aligned, and a bin button (Remove Extra line N) that deletes it. Add line below the rows adds an empty extra line, up to five per card; the text next to it counts them, for example 2 of 5 extra lines.
Defaults
These are the values a fresh installation of KLSTR.ctrl shows, and what Reset display settings puts back.
| Card | Primary (header) | Secondary | Centre indicator | Extra lines | Overlay text |
|---|---|---|---|---|---|
| NODES | Fixture type | Label | Nothing | None | Label |
| KLSTR.ONE DEVICE | Fixture type | Label | Fixture ID | 1: Protocol and universe; 2: Patch: {patch}; 3: Mode: {dmxMode} | Fixture ID |
| KLSTR.NANO DEVICE | Fixture type | Label | Fixture ID | 1: Patch: {patch}; 2: Mode: {dmxMode} | Fixture ID |
| NON-KLSTR FIXTURE | Fixture type | Label | Nothing | 1: Patch: {patch}; 2: Mode: {dmxMode} | Label |
| Card | First line | Second line | Extra lines | Overlay text |
|---|---|---|---|---|
| PORTS | Port number | Protocol, universe and direction | None | Port number only |
A template line whose placeholders are all empty disappears from the box. That is why a device without a DMX address shows no Patch: or Mode: line.
Custom templates
Pick Custom template... in a row's dropdown and type into the box that appears below it.
Write any text with placeholders in curly braces: each placeholder is replaced by that field's
value for the device, everything else is shown as you typed it. For example
{deviceName} ({manufacturer}) shows MAC Aura XB (Martin). A field without a value for a
device stays blank.
The template is saved when you press Enter or leave the box. While it contains a placeholder the card doesn't know, the box shows Unknown field: ... and the template is not saved. On the Primary (header), Secondary and Centre indicator rows, a hint reminds you that some fields may not show in the fixtures table or fleet views.
Click the Template help button (the i at the right end of the template box) to see every placeholder this card offers, with examples.

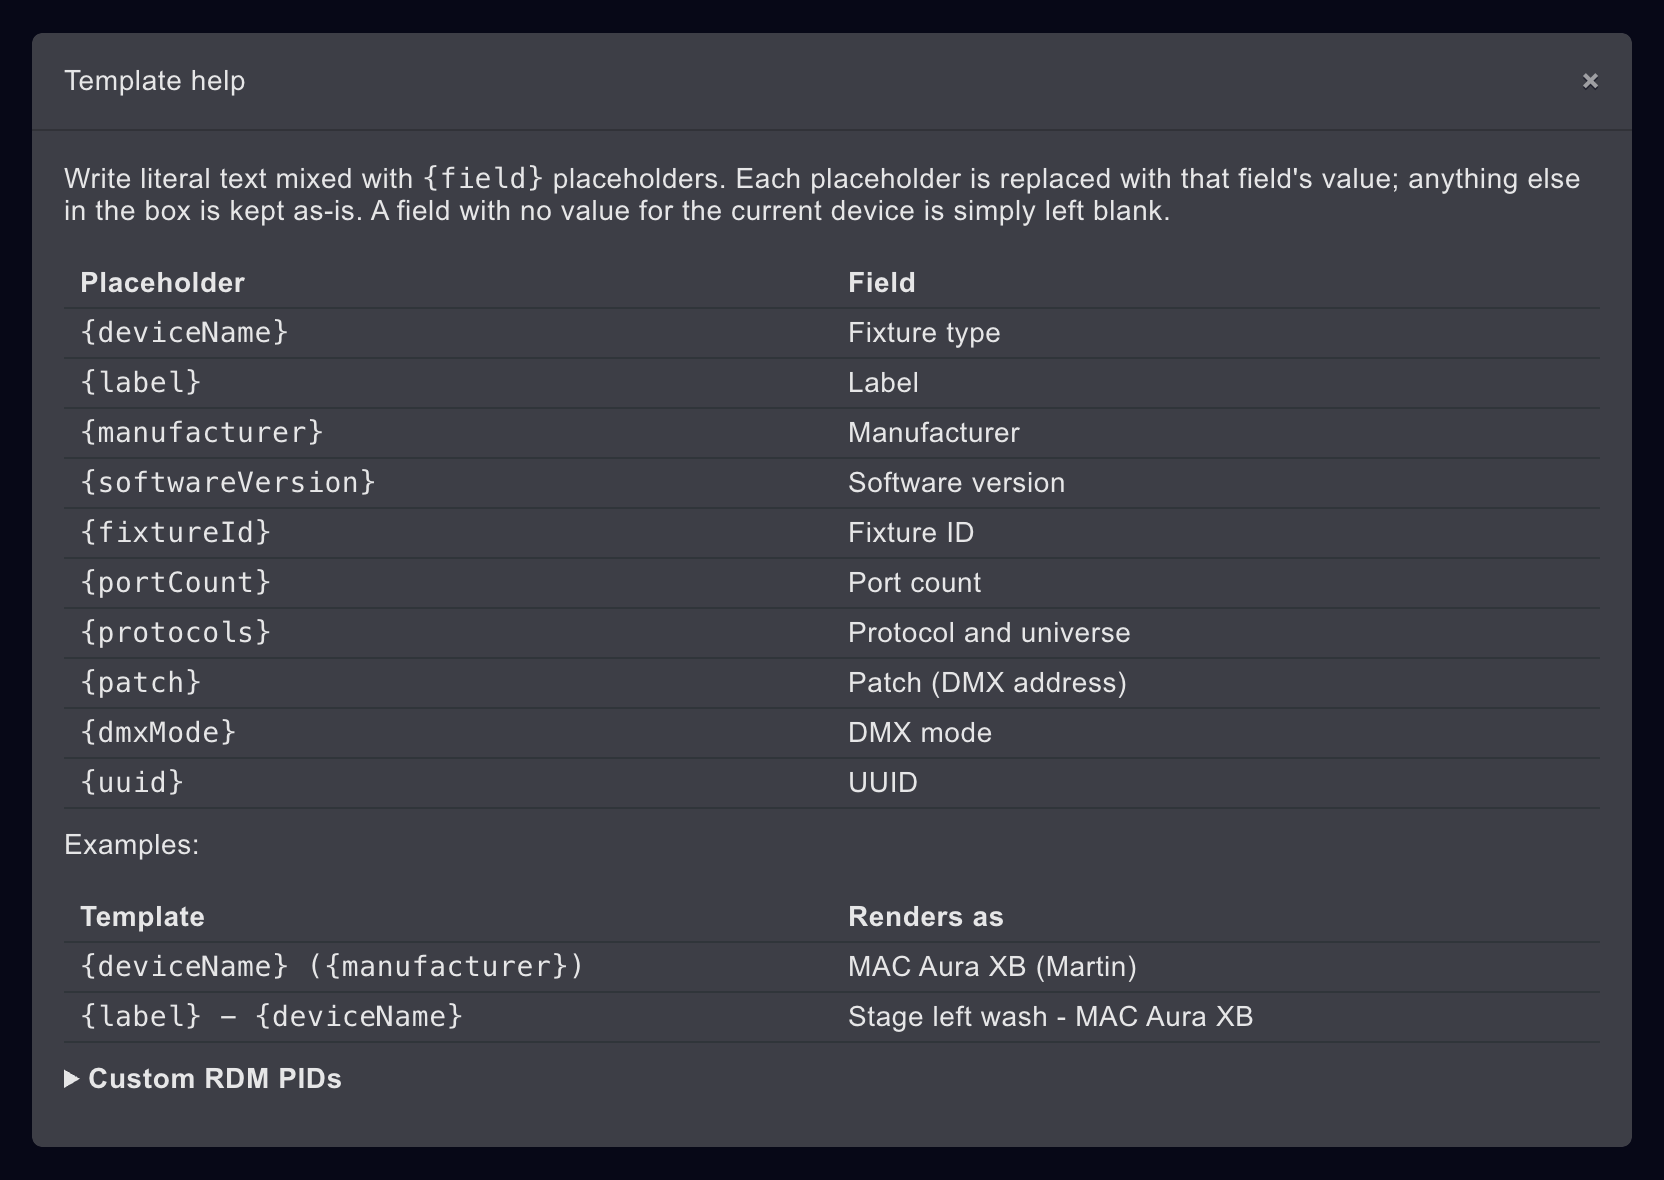
Placeholders
Device cards:
| Placeholder | Field | Offered on |
|---|---|---|
{deviceName} | Fixture type | All device cards |
{label} | Label | All device cards |
{manufacturer} | Manufacturer | All device cards |
{softwareVersion} | Software version | All device cards |
{portCount} | Port count | NODES, KLSTR.ONE DEVICE |
{ipAddress} | IP address | NODES |
{fixtureId} | Fixture ID | KLSTR.ONE DEVICE, KLSTR.NANO DEVICE |
{protocols} | Protocol and universe | KLSTR.ONE DEVICE |
{patch} | Patch (DMX address) | KLSTR.ONE DEVICE, KLSTR.NANO DEVICE, NON-KLSTR FIXTURE |
{dmxMode} | DMX mode | KLSTR.ONE DEVICE, KLSTR.NANO DEVICE, NON-KLSTR FIXTURE |
{uuid} | UUID | KLSTR.ONE DEVICE, KLSTR.NANO DEVICE, NON-KLSTR FIXTURE |
{hostName} | Host device type (the device it is connected to, for example the Art-Net node) | KLSTR.NANO DEVICE, NON-KLSTR FIXTURE |
{hostLabel} | Host device label | KLSTR.NANO DEVICE, NON-KLSTR FIXTURE |
{hostIp} | Host IP address | KLSTR.NANO DEVICE, NON-KLSTR FIXTURE |
PORTS card:
| Placeholder | Field |
|---|---|
{id} | Port number |
{number} | Port number only |
{label} | Port name |
{patch} | Universe |
{direction} | Direction |
{protocol} | Protocol |
{summary} | Protocol, universe and direction |
{hostName}, {hostLabel}, {hostIp} | The type, label and IP address of the device the port belongs to |
For example, the port template {protocol} U{patch} ({direction}) shows Art-Net U12 (out).
Custom RDM PIDs
On a device card, a template can also show the value of a manufacturer-specific RDM
parameter. Write it as {pid:ESTA:PID_NAME.param}: the manufacturer's four-digit ESTA code in
hexadecimal, the parameter's name, and the name of the value inside it.
In Template help, open Custom RDM PIDs to see every parameter KLSTR.ctrl knows, grouped by manufacturer (for example KLSTR.nano). Each row gives the parameter and its ready-made placeholder, with a copy button next to it. Paste the placeholder into the template box.
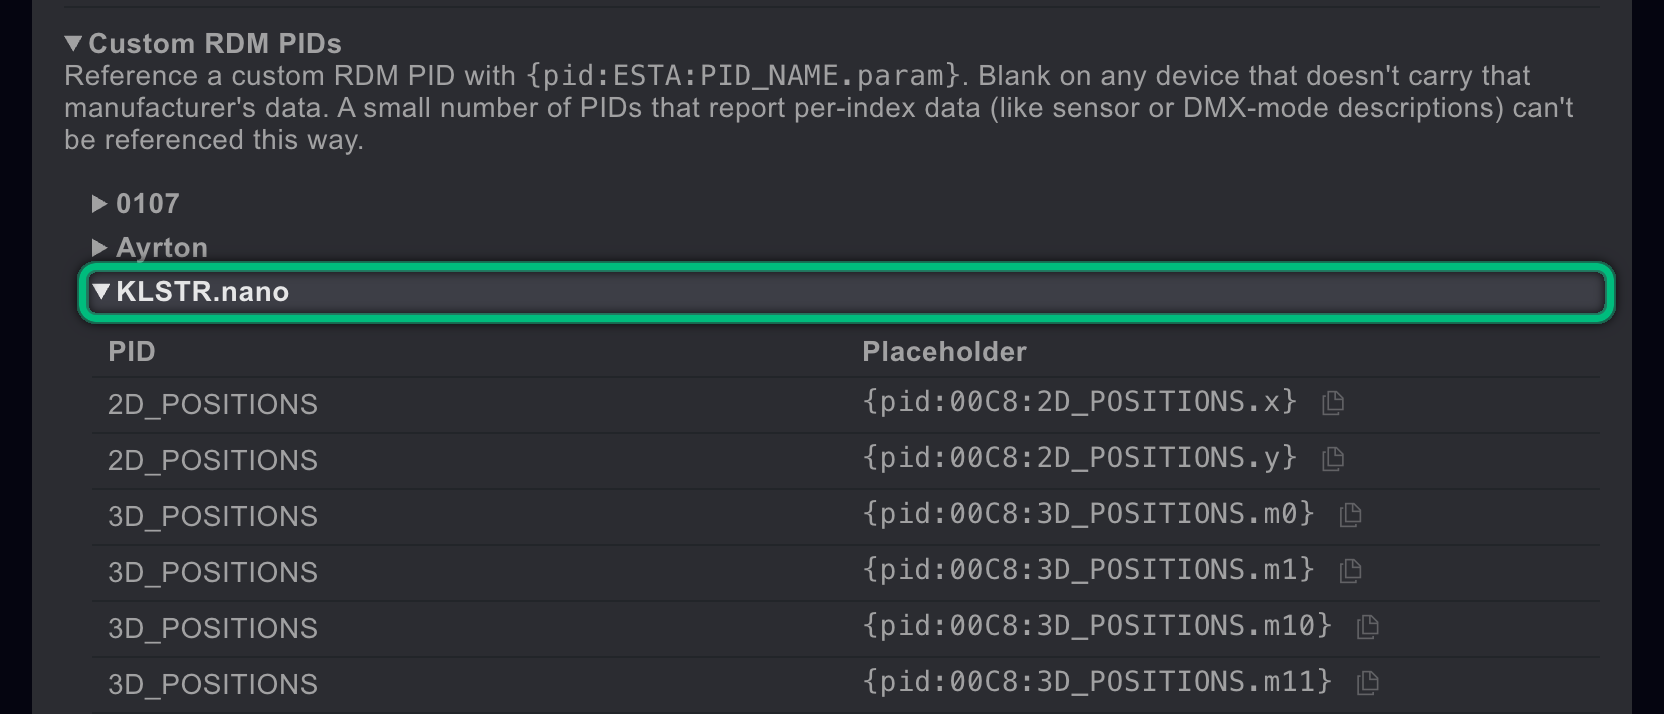
- A device that doesn't carry that manufacturer's data shows nothing for the placeholder.
- KLSTR.ctrl only reads most manufacturer-specific parameters when Fetch all RDM PIDS is on in Settings: RDM. Without it, such a placeholder stays blank.
- A few parameters that report one value per index (such as sensor or DMX mode descriptions) can't be used this way.
- Port templates can't use RDM parameters.
Related
Written for KLSTR.ctrl 1.2.0 (a0df909) · Checked 1 Oct 2026
Settings: Updates
Every setting on the UPDATES tab of User settings, for KLSTR.ctrl updates, firmware downloads and the firmware cache, with defaults and when to change them.
Glossary
The KLSTR terms used in KLSTR.ctrl and in this guide, from KLSTR.one and Fixture ID to Live mode, vendorcast and tolerance.